Air-Dry Clay and Creative Paperclay Ornaments
I love polymer clay, but I don't have easy access to an oven right now. That puts polymer clay completely out of my sphere for now. It has to be baked.
I had tried paper clay before, and decided to try it again. I also wanted to try air-dry clay. These are very different products especially when wet!
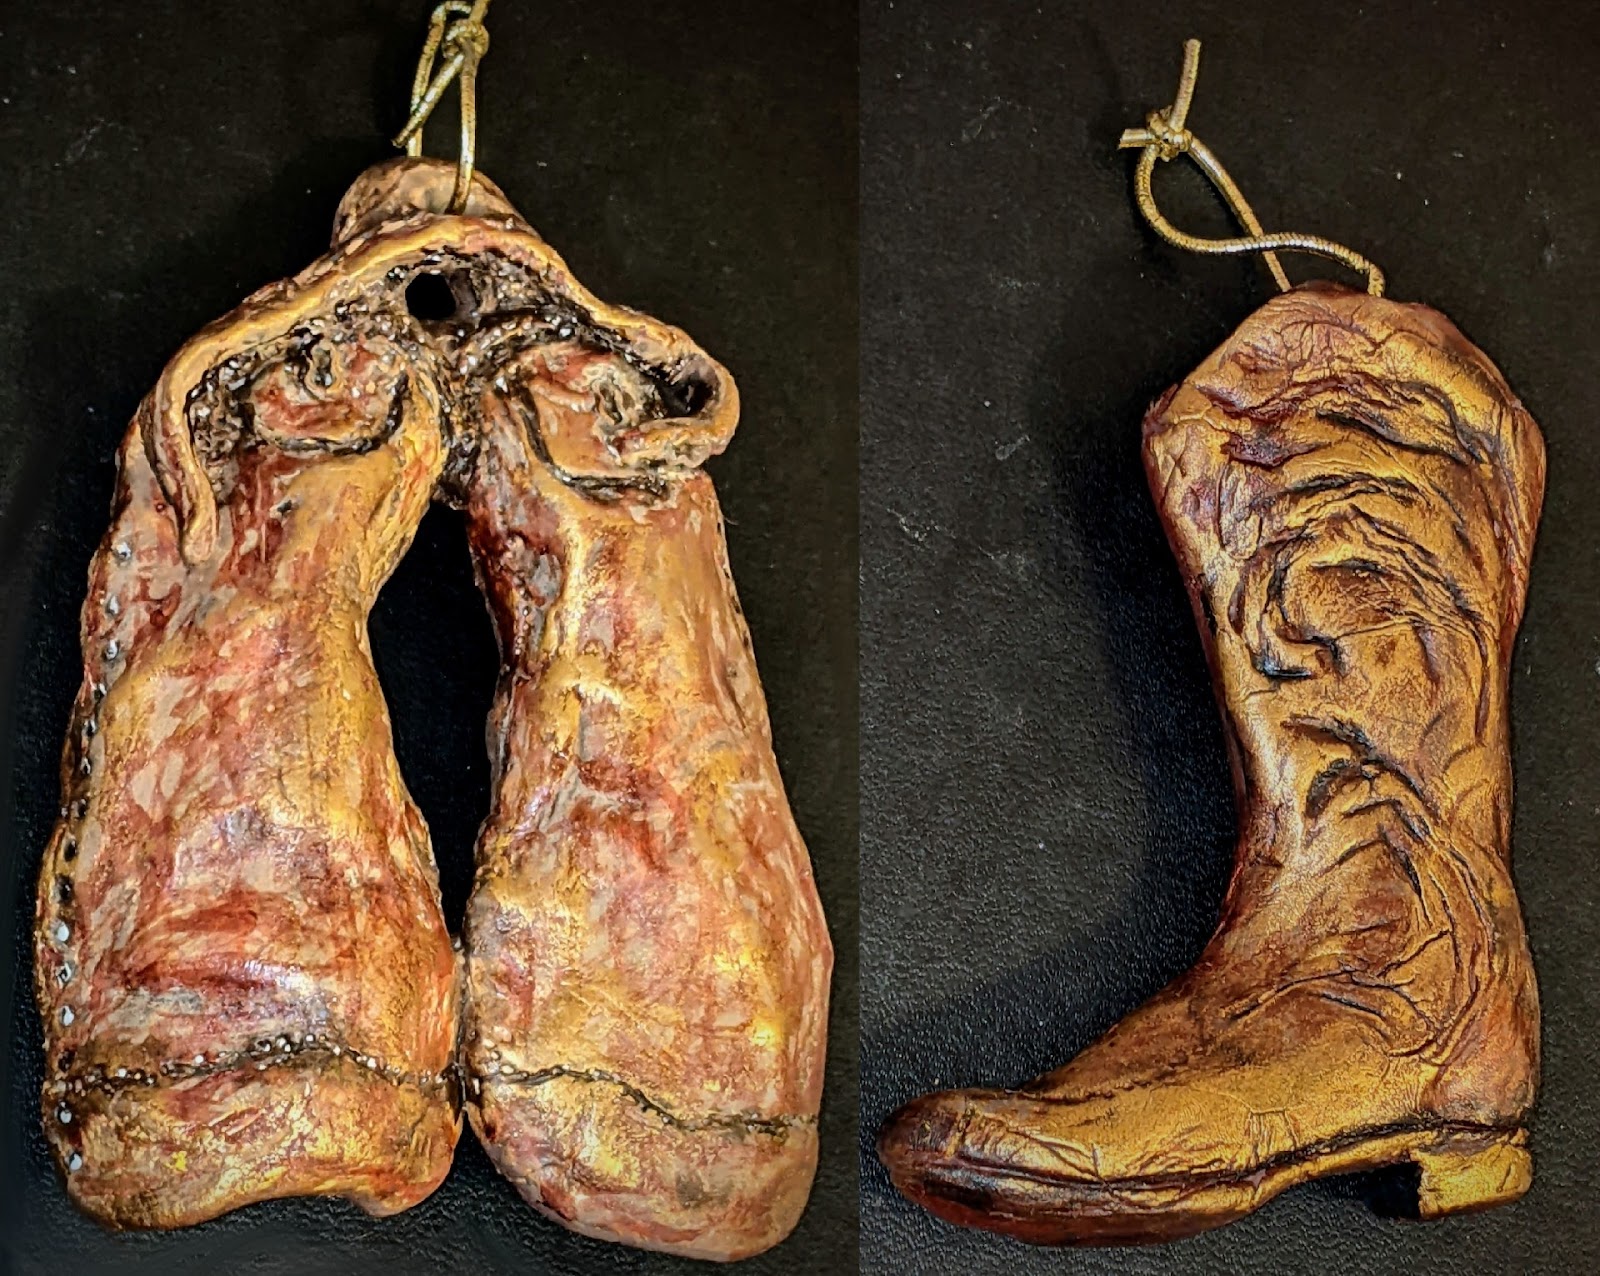
The western chaps in the photo, above, are made of paper clay—specifically, Creative Paperclay® brand. The cowboy boot ornament is made of air-dry clay. I used Polyform® ModelAir® porcelain clay. In my finished project, the appearance of the two products is similar. But actually the two materials are very, very different, both while working and when dry. Both are very different from polymer clay, too, and from real clay. This really surprised me.
Both air-dry clay and paper clay require great patience. Air-dry clay requires 24 hours to dry completely. Paper clay needs one to three days, according to its instructions. But both products start drying as you work, and may need slight dampening to keep them working. I also suggest, that just like when working with natural clay, you score (scratch) the base surface when adding wet clay to semi-hard or dry clay, or when joining two semi-dry pieces. Both products (air-dry clay and paper clay) curled slightly on the thinner ends as they dried. I successfully turned my ornaments and pressed the ends into shape before they were completely dry.
I think air-dry clay is the more versatile product, and I think it is stronger. It is heavier. The wet "clay" has the odor of white glue. I strongly suspect that white glue is the main ingredient, though ingredients are not listed on the package. Mine came wrapped in plastic food wrap inside a foil bag. I had to be careful to re-cover and close the bag quickly. I couldn't leave it open as I worked, or it started drying out. (This is also true for paper clay, but I think it's a little less urgent and can be remoistened a bit easier.)
Air-dry clay certainly has its limitations. It is extremely soft, to the point that shaping it the way you'd work with polyclay is nearly impossible. It's easy to ruin one side of a sculpture by holding it or touching it as you work on the other side. Also, when I laid my ornament down to dry, it immediately began to flatten and settle into place, in a soft, oozing way, so that some of my engraved details just softly fell out of it. Building in thin layers is probably the best way to work with air-dry clay. I have seen some fine examples.
Air-dry clay dried very hard and dried to a translucent state—again, very much like dried white glue. It calls for oil paint instead of acrylic. I was not pleased about that. However, I needed a stain rather than a paint layer, so I decided to risk black acrylic and rub the paint into the crevices (it's all I had). I used furniture scratch-cover markers, which I had on hand, to run all over the ornament surface with a mix of sienna and ochre-colored stain. Since the surface was hard and dry, the markers left uncolored spots. I just quickly rubbed and smeared the marker dye. I then rubbed on some antique gold Rub'n'Buff,® a greasy oil-and-wax-based paint. The resulting finish surprised me. I ended up with a nice ornament that has the appearance of bronzed metal or very hard wood. I had included a little clay loop for hanging—about 1/8 inch-thick, around a hole big enough to put a string through. I feel confident that it is strong enough for regular use. I don't expect it to crack.
Paper clay has a different set of positives and negatives. First, it is lightweight. That's good. It is basically a very fine papier-mâché. It is much stiffer than air-dry clay, but not nearly as pliant as polymer clay. It simply won't take the fine detailing that's possible with polyclay. It starts to dry immediately, so over-working it causes it to stiffen and crack. It dries very hard. Still, I'm not sure if I can trust the strength of it to time, so I use wooden armatures in my pieces (toothpicks, popsicle sticks, and small wooden disks). I also tried the aluminum tab off of a soda can, covering it with paper clay (leaving one hole open).

Paper clay can be painted with acrylic paint (or other types of paint, it says), which is a big plus. The dried surface is absorbent, though. It sucked my acrylic paint in quickly, making it difficult to achieve a stain. The paint dries quickly to an opaque state on paper clay. I believe that sealing paper clay before painting might be a good idea. Next time, I will seal mine with a matte acrylic sealer. Trying to paint the super-absorbent paper clay was frustrating. In the end, I managed a decent color blend, then went over the surface with Rub'n'Buff.® Rub'n'Buff® saved the day. The chaps, like the cowboy boot, ended up looking like bronze or very hard wood.
I love my ornaments. The pleasant result has inspired me to try more ornaments and jewelry. I plan to use air-dry clay to make some pendants for necklaces. Since it is strong, I also want to experiment by making some knot covers or bead covers and connectors. I hope it is strong enough to connect two necklace chains. We'll see.
I might try to make jewelry pieces with paper clay, as well, but my projects will necessarily be of a different style, that will play to paper clay's strengths. I'll probably make pendants that look like scrolls of parchment or handmade paper. I will not try to make connectors out of paper clay, unless I make very thick ones. It is strong, but maybe not strong enough to hold a chain.
Comments
Post a Comment
Your thoughts and comments are greatly appreciated!